Indicator: Multi timeframe Ichimoku Scanner with panel and alert
Product Page: click here
INPUT PARAMETERS:
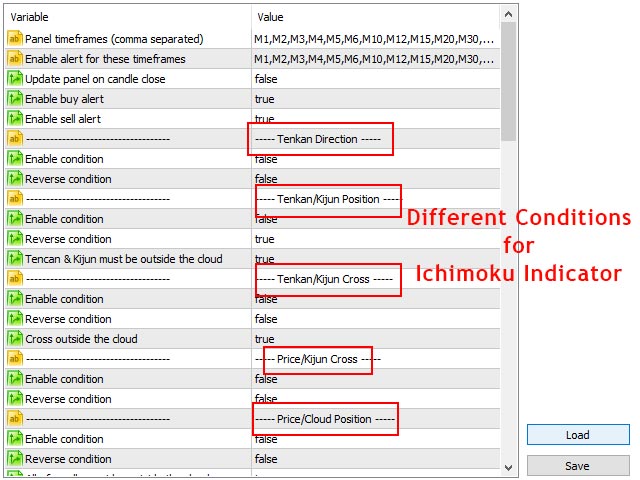
- Timefrme List: Input comma separated list of timeframes for loading in the panel, like: M1,M15,H4,D1.
- Enable alert for these timeframes: For which timeframes alert must be active when you load the panel on the chart, like: M5,M15,H4. Also you can enable and disable alerts by clicking on timeframe cells on the panel.
- Alert only on candle close: Check conditions only when candle closes. If set to true then panel cells won't change until candle close and you receive alert for a timeframe when its candle closes. If set to false then indicator checks the conditions and updates on each price tick.
- Enable buy alert: You can disable and enable buy and sell alerts separately.
- Enable sell alert: You can disable and enable buy and sell alerts separately.
Conditions:
Price/Cloud Position:
- Enable condition: Enable price above the cloud condition for buy and price below the cloud condition for sell.
- Reverse condition: If set to true, the above parameter is reversed (price above the cloud condition for sell and price below the cloud condition for buy).
- All of candle must be outside the cloud: Instead of the last price, all of the last candle should be outside the cloud to condition become true.
Tenkan/Kijun Position:
- Enable condition: Enable tenkan above the kijun condition for buy and tenkan below the kijun condition for sell.
- Reverse condition: If set to true, the above parameter is reversed (tenkan above the kijun condition for sell and tenkan below the kijun condition for buy).
- Tencan & Kijun must be outside the cloud: If set to true, tenkan and kijun lines must be outside the cloud.
Chikou/Price Position:
- Enable condition: Enable chikou above the price condition for buy and chikou below the price condition for sell.
- Reverse condition: If set to true, the above parameter is reversed (chikou above the price condition for sell and chikou below the price condition for buy).
- Chikou must be outside N last candles: If set to true, chikou price must be above/below the last candles (check following parameter).
- Number of candles: Number of candles for the above parameter. For example, if you set this parameter=3, then for buy condition chikou price must be above the highest high of the last 3 candles and for sell condition chikou price must be below the lowest low of last 3 candles.
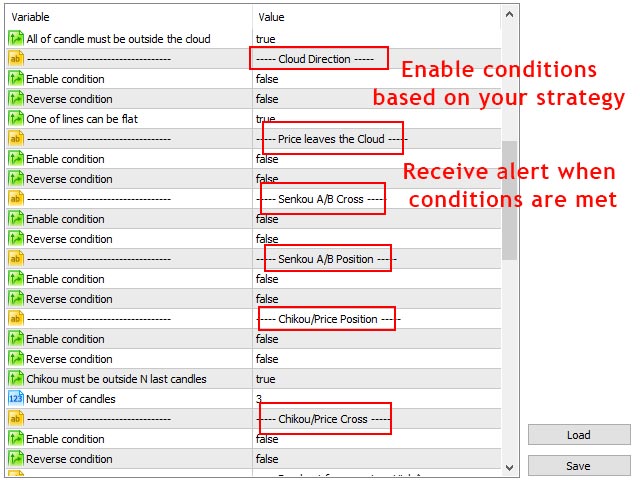
Cloud Direction:
- Enable condition: If both senkou lines are going upward it is condition for buy and If both senkou lines are going downward it is condition for sell.
- Reverse condition: If set to true, the above parameter is reversed (if both senkou lines are going downward it is condition for buy and if both senkou lines are going upward it is condition for sell).
- One of lines can be flat: If set to true, one of the senkou lines can be flat.
Tenkan Direction:
- Enable condition: If the tenkan line goes up it is condition for buy and if the tenkan line goes down it is condition for sell.
- Reverse condition: If set to true, the above parameter is reversed (if the tenkan line goes up it is condition for sell and if the tenkan line goes down it is condition for buy).
Tenkan/Kijun Cross:
- Enable condition: If the tenkan line crosses above the kijun line it is condition for buy and if tenkan line crosses below the kijun line it is condition for sell.
- Reverse condition: Reverse the above parameter (if the tenkan line crosses above the kijun line it is condition for sell and if tenkan line crosses below the kijun line it is condition for buy).
- Cross outside the cloud: Line crosses must be outside the cloud.
Price/Kijun Cross:
- Enable condition: If price line crosses above the kijun line it is condition for buy and if price line crosses below the kijun line it is condition for sell.
- Reverse condition: Reverse the above parameter (if the price line crosses above the kijun line it is condition for sell and if price line crosses below the kijun line it is condition for buy).
Price leaves the Cloud:
- Enable condition: If the open of candle is inside the cloud and close of the candle is above the cloud it is condition for buy and if the open of the candle is inside the cloud and close of the candle is below the cloud it is condition for sell.
- Reverse condition: Reverse the above parameter (if the open of candle is inside the cloud and close of the candle is above the cloud it is condition for sell and If the open of the candle is inside the cloud and close of the candle is below the cloud it is condition for buy).
Senkou A/B Cross:
- Enable condition: If Senkou A line crosses above the Senkou B line it is condition for buy and If Senkou A line crosses below the Senkou B line it is condition for sell.
- Reverse condition: Reverse the above parameter (if Senkou A line crosses above the Senkou B line it is condition for sell and if Senkou A line crosses below the Senkou B line it is condition for buy).
Chikou/Price Cross:
- Enable condition: If the chikou line crosses above the price line it is condition for buy and If chikou line crosses below the price line it is condition for sell.
- Reverse condition: Reverse the above parameter (if the chikou line crosses above the price line it is condition for sell and If chikou line crosses below the price line it is condition for buy).
Senkou A/B Position:
- Enable condition: If Senkou A line is above the Senkou B line it is condition for buy and if Senkou A line is below the Senkou B line it is condition for sell.
- Reverse condition: Reverse the above parameter (if Senkou A line is above the Senkou B line it is condition for sell and If Senkou A line is below the Senkou B line it is condition for buy).
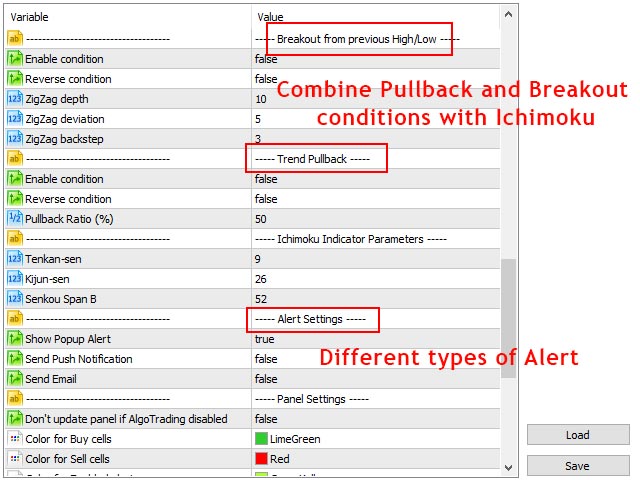
Breakout from previous High/Low:
This parameter uses zigzag indicator to find high and low points of the price moves in the chart.
- Enable condition: If price moves up and breaks the last high it is condition for buy and if the price moves down and breaks the last low it is condition for sell.
- Reverse condition: Reverse the above parameter (if price moves up and breaks the last high it is condition for sell and if the price moves down and breaks the last low it is condition for buy).
- ZigZag depth: Value of the "depth" parameter for the zigzag indicator.
- ZigZag deviation: Value of the "deviation" parameter for the zigzag indicator.
- ZigZag backstep: Value of the "backstep" parameter for the zigzag indicator.
Trend Pullback:
Like the previous condition, this one also uses zigzag indicator to find high and low of the price moves in the chart (and uses zigzag parameters from previous condition).
- Enable condition: If price pulls back (moves down) in a bull trend, it is condition for buy and if the price pulls back (moves up) in a bearish trend it is condition for sell.
- Reverse condition: Reverse the above parameter (if price pulls back in a bull trend, it is condition for buy and if price pulls back in a bearish trend it is condition for sell).
- Pullback Ratio (%): Percent of pullback, you can use fibonacci values like 38.2, 50, 61.8 and etc.
Ichimoku Indicator Parameters:
- Tenkan-sen: Value of the "Tenkan-sen" parameter for the ichimoku indicator.
- Kijun-sen: Value of the "Kijun-sen"parameter for the ichimoku indicator.
- Senkou Span B: Value of the "Senkou Span B" parameter for the ichimoku indicator.
Alert Settings:
- Show Alert: Show popup alert for buy and sell signals.
- Send Push Notification: Send push notification to mobile phone for buy and sell signals (you should set metatrader Notifications options).
- Send Email: Send email for buy and sell signals (you should set metatrader email options).
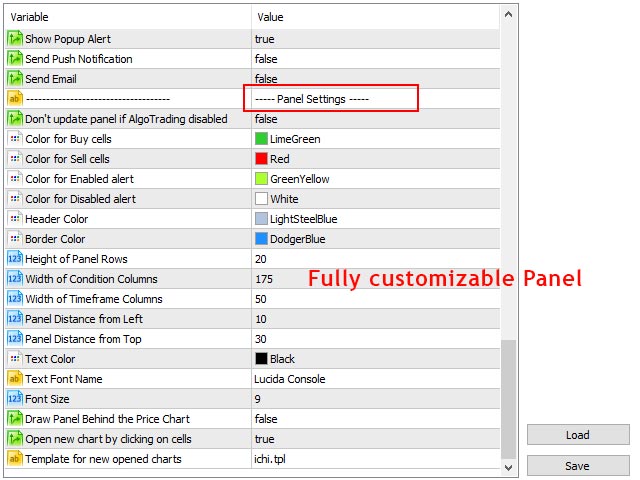
Panel Settings:
- Don't update panel if AlgoTrading disabled: Don't update the panel if metatraders "AlgoTrading" button is disabled. This is useful when you have many charts open with this indicator on them and you want to disable alert for all of them.
- Color for buy cells: Colors for cells that indicate buy conditions.
- Color for Sell cells: Colors for cells that indicate sell conditions.
- Color for Enabled condition: Color for enabled conditions on the panel.
- Color for Disabled condition: Color for disabled conditions on the panel.
- Header Color: Color of header of the panel.
- Border Color: Color of borders of the panel and its cells.
- Height of Panel Rows: Height of the panel rows.
- Width of Condition Columns: Width of first column of the panel that shows the conditions.
- Width of Timeframe Columns: Width of other columns of the panel.
- Panel Distance from Left: Panel distance from left of the chart.
- Panel Distance from Top: Panel distance from top of the chart.
- Text Color: Color of panel texts.
- Text Font Name: Font name of panel text.
- Font Size: Font size of panel text.
- Draw Panel Behind the Price Chart: If set to true, you can see the price chart in front of the panel.
- Show timeframe by clicking on table cells: If set to true, chart timeframe changes when you click on panel cells (based on the timeframe column), also check the following parameter.
- Template for new opened charts: You can set a template for the new chart that opens from the previous parameter.
How to use the Ichimoku Scanner Bridge in expert advisors:
This bridge is a fast and lightweight version of Ichimoku Scanner indicator (a separate file from the main indicator) that you can use in the code of your expert advisors and indicators to check different conditions of ichimoku indicator for all metatrader timeframes.
Graphical objects are removed from the bridge but all necessary options are preserved so you can control the parameters like in the main indicator.
There are 13 buffers in the bridge that you can load them with iCustom function in your EA or indicator code. Each buffer is related to one of the conditions in the main indicator and shows that condition is correct for which of the metatrader timeframes.
So in your EA you will have 13 buffers and each buffer has 9 value for 9 timeframe of MT4 (21 values for the 21 timeframe of MT5), the first value for M1 and the last value for the MN1 timeframe. For example, you can name buffers as:
- Tenkan_Direction[] // For Tenkan Direction condition
- Tenkan_Kijun_Position[] // For Tenkan/Kijun Position condition
- Tenkan_Kijun_Cross[] // For Tenkan/Kijun Cross condition
- Price_Kijun_Cross[] // For Price/Kijun Cross condition
- Price_Cloud_Position[] // For Price/Cloud Position condition
- Cloud_Direction[] // For Cloud Direction condition
- Price_Leaves_Cloud[] // For Price leaves Cloud condition
- Senkou_A_B_Cross[] // For Senkou A/B Cross condition
- Senkou_A_B_Position[] // For Senkou A/B Position condition
- Chikou_Price_Position[] // For Chikou/Price Position condition
- Chikou_Price_Cross[] // For Chikou/Price Cross condition
- Break_High_Low[] // For Breakout from H/L condition
- Trend_Pullback[] // For Trend Pullback condition
Each of the above buffers will have 9 (for MT4) or 21 (for MT5) values.
For MT4 the range of arrays will be from 0 to 8, 0 for M1 timeframe and 8 for MN1 timeframe. For example:
- Tenkan_Direction[0] shows the direction of the tenkan line for the M1 timeframe.
- Price_Leaves_Cloud[5] shows the price position relative to ichimoku cloud for H4 timeframe
- Break_High_Low[8] shows if the price breaks the previous high/low in the MN1 timeframe.
For MT5 the range of arrays will be from 0 to 20, 0 for the M1 timeframe and 20 for MN1 timeframe. For example:
- Cloud_Direction[0] shows the ichimoku cloud direction for the M1 timeframe
- Tenkan_Kijun_Cross[4] shows if the tenkan line crosses the kijun line (and the cross direction) in the M5 timeframe
- Trend_Pullback[14] shows if we have a pullback in the H4 timeframe
To see how to implement the bridge in your code, please refer to the sample EA you received with the bridge.
A few notes:
- After you set the parameters for a symbol, you can save the settings and use them for other symbols.
- Do not enable "Breakout from previous High/Low" and "Trend Pullback" conditions together, these conditions do not occur at the same time.
- In addition to the above parameters, you can also enable/disable conditions and timeframes by clicking on their cells on the panel, and you can reset them to the above parameters by changing the chart timeframe.


